Interactive Portals for Spark AR: Defining the logic
- Dn Cherry

- Jul 1, 2022
- 5 min read

Concept
During Halloween, I lacked decorations compared to my neighbors and thought an augmented reality experience for trick or treaters would be fun. The idea of three portals presented to the tricker treater where one portal has candy, and the other two have a scary surprise came to mind. The entire idea is out of scope, so I decided to focus on the logic with quick 2D designs done in Illustrator with plans to update to a 3D version next year.
Portals are a common element in augmented reality (AR) pieces. They function as a logical narrative tool for digital elements coming into our world or used to peep into a new world. Two of my favorite experiences utilizing this technique are Undersea by Magic Leap and Dr. Gordbort's Invaders by Weta Digital. They both use the AR wearable device Magic Leap, allowing, in my opinion, deeper immersion than handheld mobile devices.
The augmented reality filter is built with Spark AR by Meta. Below I step through the key logic of the experience, using only patches. Try out the experience for yourself and think of how to replicate the filter: Instagram or Facebook. Note: Door and portal are used interchangeably in this post.
Defining Base Logic
Defining the logic of your experience doesn’t need to be a complicated thing. Start by stepping through your intended experience and write each step out in a list. Subtract and add to the list as you develop the filter. As you work through implementing each item on the list you can further break it down if you run into problems. Solve one piece of the problem then move to the next.

For my experience, my base logic was as follow:
Tap start for experience
3 portals to choose from with animated texture (see last blog)
Portals have a random monster behind the portal
Randomizes after start is pressed
One door must have monster with candy
When the portal is tapped, monster is revealed
Restart button appears after x amount of time
Once tapped, it starts the experience over again
After getting through the initial logic and design, these ideas came to mind:
When one door is tapped, the other two doors hide, and monster is revealed
Music plays while portals aren’t tapped
Sound is played when monster is revealed
Happy music if candy monster is found
Scary music if hungry monster is found
If candy is found then, candy falls around the user
If Hungry Monster is found, then the background gets darker
Writing it out can help you realize the patches needed to execute the logic, such as saying if/then. Middle school science classes teaching hypothesis processes may seem irrelevant to our younger selves, but If/Then statements are a core to coding and using patches in Spark AR.
When working on these experiences, especially myself, my process is typical: concept the experience, write out the logic, test logic with proxy objects (think spheres and cubes), flush out design elements, and clean up logic and file. This process tends to iterate in multiple loops before getting to the final product.
Challenge: While reading the blog, open up Spark AR and attempt to create the logic before looking at the screenshots or the entire downloadable file.

Deciding Winning Portal
The core of the experience is finding the portal with the candy. That is focusing on the logic:
Portals have a random monster behind the portal
Randomizes after start is pressed
One door must have monster with Candy

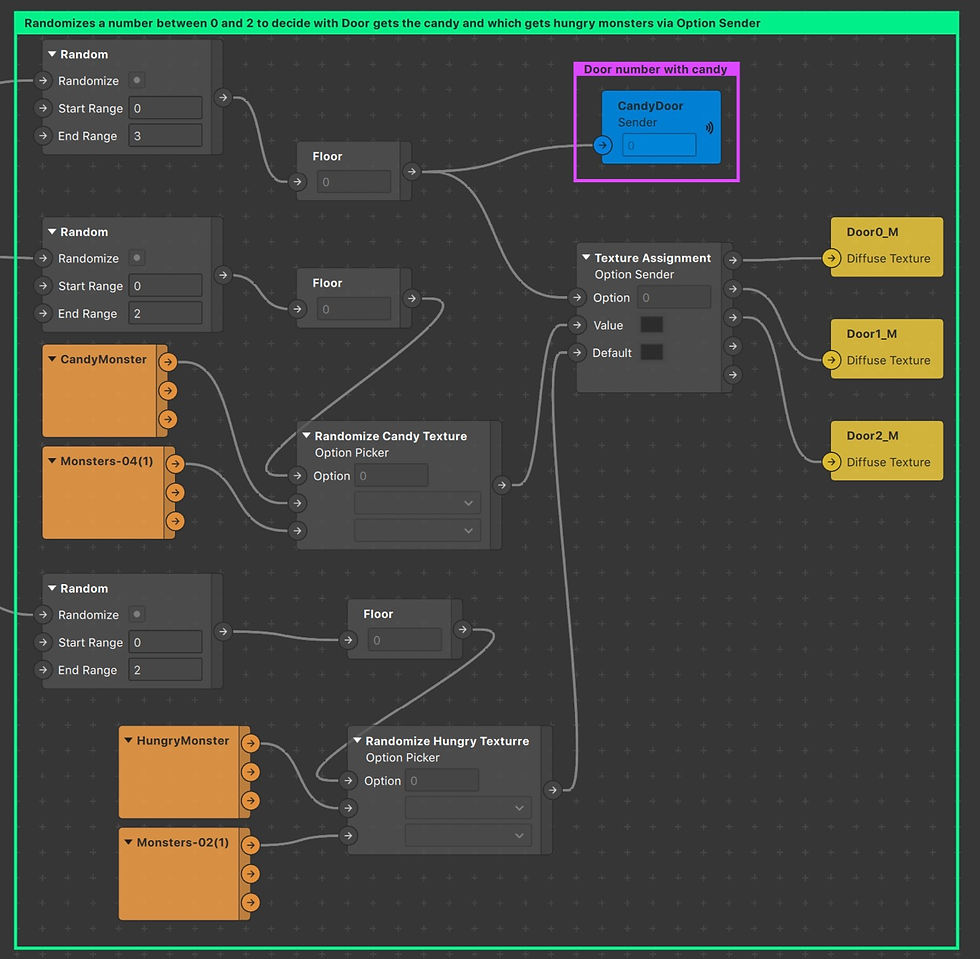
We decided, well I decided, there will be three portals for the experience. This means in Spark AR adding three 3D planes that randomly choose a monster texture, where at least one plane depicts the candy texture. At this testing stage, all the planes are visible with the texture (not worried about hiding them). First, we generate a random number reflecting the candy's portal, and the three planes are given a number from 0 - 2. An Option Sender patch is used to control assigning the candy texture to the winning door (see image below). The losing doors will be set to the default (hungry monster texture) of the Option Sender. Both the candy and hungry textures have two versions that are also randomly selected. The Floor patch is used to round down decimals to whole numbers. The 3D planes are placed as children of the Plane Tracker, making the experience a world AR filter.
Setting the winning door as a Sender patch, named CandyDoor, allows it to become a variable (container of information) that we later use to connect via Receiver patch to other pieces of logic. Utilizing Senders and Receivers lowers the redundancy of duplicated patches and creates a cleaner graph.
*Tip: when duplicating, Receivers click the down arrow to ensure the intended Sender is selected. When pasting a Receiver, the Sender name will appear as active, but from experience, it isn’t.

The final part of this section is adding a start button to activate the random selection. Prior, manually activating the random patch was done to test the textures on the portal.
To create a start button:
Create a 2D Rectangle to the desired size
Connect the plane object (called Start in the example) to an Object Tap patch
Connect the Object Tap to the Randomize patches
Revealing Monster
The experience wouldn’t be intriguing if we left the monster textures visible. The monsters are hidden (visibility turned off) initially, but each 3D plane is duplicated and assigned the animated portal texture you see at the beginning of the filter. The planes with the animated texture are labeled “Door #” the planes with the monster are labeled “Door #_M.” Once one portal is tapped, the monster texture will be revealed, and the other two portals will hide (their animated texture turned off). This is primarily achieved through the Option Sender patch (data type set to Boolean). Connected is the Option Switch, where each portal is assigned to an option number. For example, if door/portal 0 is tapped, it sets the Option Sender to 0, signaling Door 0 to be visible. Since a door has been tapped, the Default switches off.

The Door 0,1,2 Tap Receivers we see above come from the graph below. Included in the logic is enabling the ability to tap the portals after the start button has been pressed and revealing the monster texture of the selected portal.

Sound
In the additional logic, I added:
Music plays while portals aren’t tapped
Sound is played when the monster is revealed
Happy sound if candy monster is found
Scary sound if the hungry monster is found
We need to create a variable(using Sender and Receiver patches) that tells us if the door we tapped is a winner or loser in order to play the correct sound. The variable is called Door#_WinningStatus. Determining the winning status, we compare the Candy Door (the random number assigned the candy texture) to the status number of the tapped door. If both numbers are equal, then it is the winning door, else the user loses and gets the hungry monster texture.
This logic is grouped into the Winning Status patch. Try to determine what patches are used within the Winning Status patch based off the statements in the prior paragraph and logic we already covered.

Download the Winning Status patch to see if you were right or if you need some clues.


Download the entire file below to support and get a more detail look at the process.
Trick or Treat Filter - SparkAR File
Buy Now
Spark AR Competitions
*When submitting to challenges, be mindful of the full rules, with emphasis on sharing/licensing rights to your filter.
How do you all handle quick personal projects, whether it’s for fun or to learn?
Do you set a timer for an extended or short period? I know my most successful moments in these situations come when I meal prep, have a bottle of water nearby and have a decently clear schedule (no obligation that would cause stress). Finally, set an overall end goal (ex. 9 hours), taking into account breaks to walk around, use the bathroom, staring out the window, or talk to rubber ducks.


Comments