Spatial Storyboard Templates for Augmented Reality and Virtual Reality
- Dn Cherry

- Jul 1, 2022
- 4 min read
Updated: Oct 31, 2022
What are storyboards?
In video productions, storyboards are used to help visualize the story and timing; they are the sequence of images depicting your project's continuity with a focus on composition and camera position. They can be viewed as the blueprints for the project; however, they are not a requirement for all projects. On the live-action and animated productions I worked on, storyboards were used ninety-five percent of the time. Director Bong Joon Ho utilizes storyboards for his film and has stated they help reduce his anxiety (can purchase the book here or watch this video by Thomas Flight reviewing the boards). If you love Parasite and film/cinematography in general, I recommend getting the graphic novel as it reveals meticulous planning and insight into the story.
In addition, storyboards for live-action films boards can incorporate the spatial view of a scene, such as the size of a given room and which walls will have cameras behind them or map out the route of a car race. As we can see in Joon Ho's boards, they can be presented as quick sketches or in neat format with finely detailed drawings. The director has control of what the audience is watching, so each shot can be planned accordingly. Storyboards are a visual planning tool and are not restricted to only films, as we will see below.
Additional books covering storyboards: Shot by Shot by Steven Katz (a classic text for film schools), Storyboarding Essential by SCAD, and The Art of the Storyboard: A filmmaker's introduction by John Hart, who covers an excellent history/origin on the topic in the first chapter.
The Templates
For augmented reality (AR), the director's control is reduced, and agency is given to the user (where they control the camera); the same is for virtual reality (VR). Essentially the user is the camera and has a broader view than traditional digital mediums. The templates are designed for those new to the concept of storyboarding and creating a spatial experience or who need a starting place to start their design process.
Utilizing the boards helps with design layout, interaction, and navigation planning for an immersive experience - building presence around the user. This provides direction to the entire team - designers and developers. Here immersive experience will refer to virtual reality, augmented reality, and dome technology.
The template base is inspired by Christina Ingwalson's article ``How to Storyboard for AR VR Project Success". Ingwalson's approach is practical; however, the cube layout limits the view of the user's whole environment and where they can potentially move during the experience. Being visually able to predict where the user may move helps designers and developers create engaging content and strategize ways to guide them during the experience. Her board also represents a VR experience versus one for AR. The making of Magic Leap's Undersea also helped with the creation of these boards.
Although AR medium component is space, the 2D design concept is still handy for fast iterations and sharing with multiple people, especially when limited on devices. When approaching the storyboard layout for the project, I took into account architecture, live-action boards, level design planning in games, interior design, and museum layouts. The focus was placed on storyboarding each scene, similar to production illustrator Ralph McQuarrie work on Star Wars. He painted the eight major scenes in detail versus each shot as we typically see in production boards (referenced from the book, Shot by Shot). The panel below represents the

board for scene 8 of the project Sleeping Giant. The scenes can be broken down further, utilizing the second template to convey animation. With the ability to visualize the space through the boards, techniques to encourage the user to move about can further be approached.
In his book The Art of Game Design, award-winning game developer and professor Jesse Schell noted that audience members are accustomed to screen-based media (think flat screens such as a tv), so they naturally will not move around. For Sleeping Giant, visual elements were explored, as well as interactions to encourage movement. For example, the gallery photos are placed at an angle in the exhibit level, creating leading lines to the center photo.

The goal here is to motivate the user to move from behind the podium (where they initially start) to view the photos.
Formal boards like these aren't required, but due to the control audiences have, unlike films, it is imperative to be mindful of the space and how your story unfolds in it. There should be at least one visual showing where all elements are positioned in space to represent where the user can potentially look.
For the virtual reality short Cycles, director Jeff Gibson helps guide the audience by turning unimportant parts of the house to greyscale. The goal here is to encourage the user to turn back to the vivid scene where the central part of the story is happening. I experienced the short at Siggraph 2018 and found this technique extremely effective (check the interview from the event here). Even when purposely turning away from the story, the grey color scheme was mundane, and the characters' sound consistently drew me back.
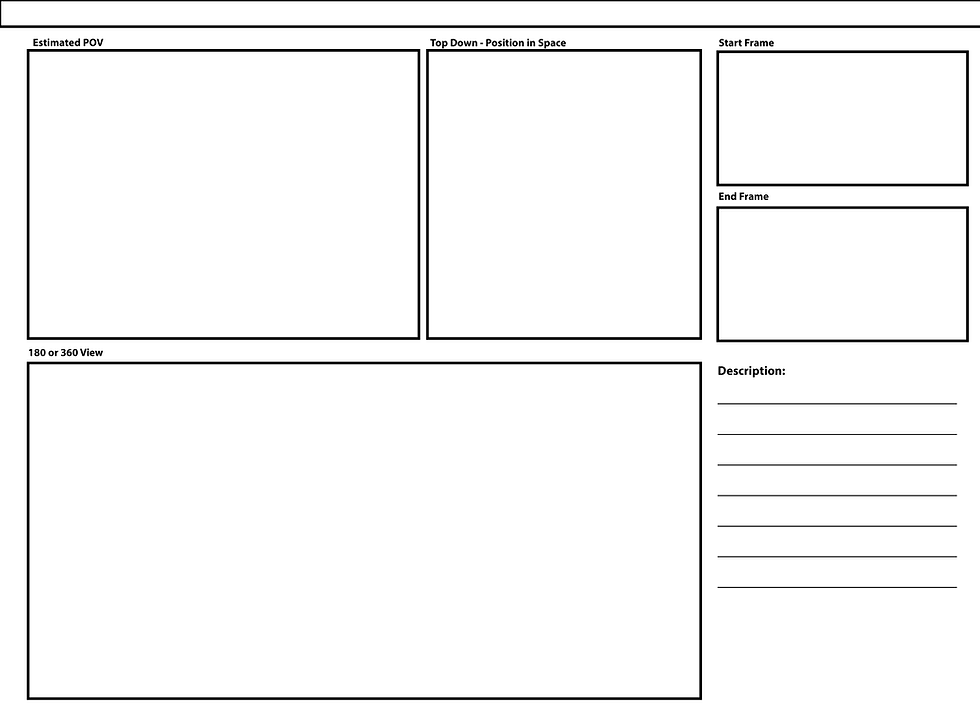
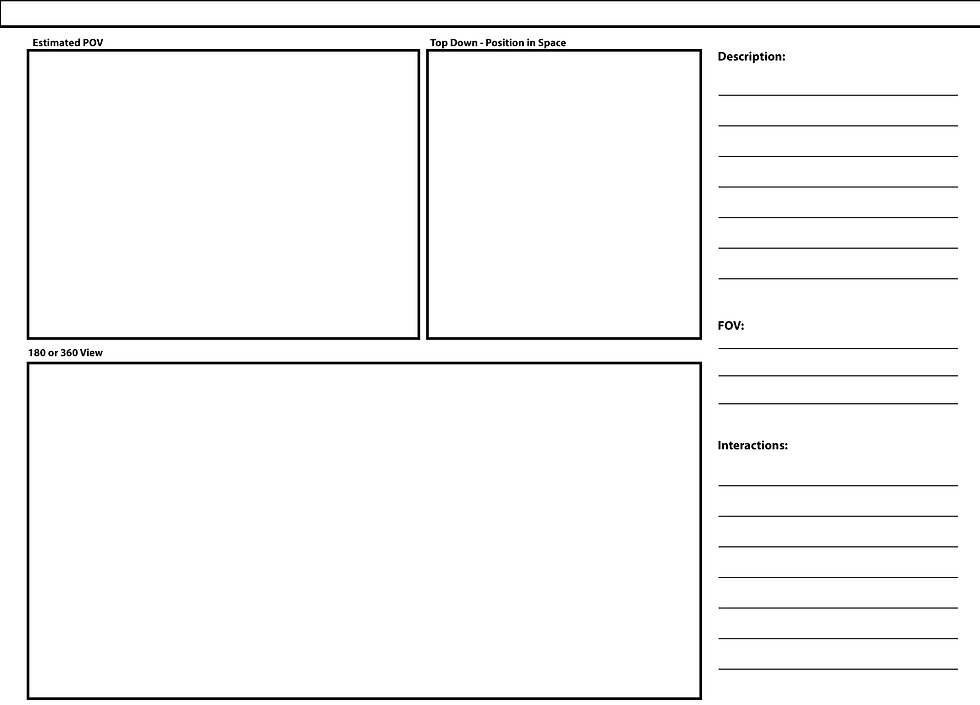
Template Key
Here is a breakdown of each section in the templates.
Estimated POV | The estimate of the user's point of view during the experience - what are they currently looking at. Now, they could be looking anywhere; however, you want to depict the main part of the scene you would prefer them to be viewing. Or multiple events that happen in a given scene. |
Top-Down - Position in Space | This provides a birds-eye view of where the user is in perspective of the full scene. |
180 OR 360 view | Determines if you are depicting half or the whole scene. You will draw that here. For AR, it can be a room or an outdoor location with the digital elements added in. Be sure to note the difference between physical elements versus digital. |
Start Frame | How the scene starts. If the user should be facing a particular direction, then specific elements are needed to guide them. |
End Frame | How the scene will end. In Sleeping Giant, the scene ends when the user turns the page in the book on the podium. |
Description | Breakdown of the scene: characters, sounds, objects spawning, etc. |
FOV | All the objects in the full field of view |
Interactions | Elements the user can engage in, triggers to be aware of, or if any triggers are needed to advance the story. |
The start and end frames are helpful to note when you have an interactive scene. Drawing the whole set out in the 180 or 360 section assist in planning if a specific room or wall requirement is needed. In addition it provides planning for navigating the user. For the scene 3 and 5 boards there three grey curves drawn over the 360 scene. This is to represent, similar to Cycles effect, the user's space turning to a greyscale color scheme if they were to look in either of those direction.
For help with drawing in perspective and designing for space in general, check out the book Drawing Perspective and/or Volodymyr Kurbatov's templates for sketching in AR/VR.
Download boards here
To learn more about how this template was utilized for an AR narrative, check out my thesis Window into Vesuvius. This example of storyboarding for XR focused on a 2D approach; however, numerous 3D applications have been designed to aid in the process (majority of these utilize VR). If interest is shown, I can do another post listing these applications.


Comments